


How to Make a Pickle Rick Costume Guide
- Doccane
- Oct 6, 2017
- 12 min read

By Doccane Cosplay
Follow Me!
Email: drcane24@gmail.com
Doccane Cosplay here! I’ve had a mind-blowing amount of coverage of my Pickle Rick lately. Thanks to all who’ve shared, liked, commented. You’ve all made my time working on the costume and sweating at the con wearing it all worth it. I am asked often how I created it so here goes a detailed tutorial on how it all came together.
First off, it took about 70 hours in all, including my failures when I had to remake a part. If you want to complete this cosplay, you’ll need some basic sewing skills. I’ve only been sewing for about a year and it’s the first time I did any leggings and gloves which weren’t all that complicated. I did use the same stretch fabric over EVA foam technique I did on Mr. Meeseeks so some time was shaved since I had that mask template already.
It cost roughly $400.00 for all the supplies (not including tools). If you have shoes, a top, and bottom to use then you almost have saved $100 right there.
I think if you're one of those who have never made a costume and just want this for Halloween, you can still be the life of the party with just the pickle section and some of the details. You still need to sew together the green fabric to the body so either find a friend who sews or get yourself a sewing machine.
Tools Needed
For pickle EVA foam body
Exacto knife
Dremel
Zip Ties
Paint Brush
Respirator
Safety Goggles
Table Sander (Optional but makes your life so much easier)
For top, leggings, and green fabric
Sewing machine
Fabric Scissors
Supplies Needed
I found some great stretch vinyl by Yayahan at Joanne’s. It’s currently on clearance sale. Hope they’re not discontinuing it. You could also use a 4 -way stretch spandex.
Various Fabric
Any 4-way stretch fabric will do. It’s up to you how exact you want to match all his body parts and what colors to use, but I found this to be a great match.
Dark Pink Stretch Fabric (1 yard)
LIght Pink Stretch Fabric (1 yard)
Bone Off-White Stretch Fabric (1 yard)
Grey Rat Fur (1 yard)
See Through Screen Fabric (Square big enough to cover mouth)
The only thing that is pre-made on the costume.
12 sheets
5 bottles
Just need a couple pieces for the pickle dimples and tongue. You can buy just a white or black square and just paint it green, but the variety pack is cheap and has all the colors.
Light green
Regular green
Red
Spray Paint or Acrylics (Rust-Oleum recommended)
Light Blue for eyebrow
Bone White for bones
White for eyes
Metallic silver for leg piece and gauntlets
Dark Blue for gauntlets
Black for gauntlets and trim on bones
3 Inches
2 balls
PVC Pipe (Various sizes)
Two feet of ¾ inch pipes
One short section of wide 2 inch pipe.
Plain and smooth so you can lay fabric over and not have to fight bumps
Anything in plain black. The more breathable the better since you sweat a lot in the costume.
Creating The Pickle

If you want the minimum pickle impact for Halloween and you don’t have crazy crafting skills then hopefully you can make at least the pickle with some of the details. You should still be the life of the party without the rat limbs and all.
Make the EVA Foam Body
First thing to do is make a pattern for the EVA foam body that is underneath the green fabric. Before you get started, you need to make sure it will fit your body. I created mine from a Mr. Meeseeks mask pattern I made previously that fit super large over my head and would wrap around my body when I added more EVA foam below it. I’m 5’10 and 170 lbs with a 32” waist. If you’re any bigger you’ll have to make your pattern a bit wider.
I found a large ball at Target for $3.00 and added some extra christmas wrap to the bottom to fill out the neck section. Next you cover it in masking tape or duct tape completely so you can draw your pattern on it before cutting it out. Draw the eyes and mouth so you know where they will go then draw lines where you will make your cuts. I’m using the widely used Evil Ted technique to make mask patterns. Check out his video for all the ins and outs of it.


Once you have the pattern all cut out, you’ll need to make a second one for the bottom of the pickle. When you have both sections cut out, it’s time to start gluing everything together.
Since we want to add a big tube middle section between the two rounded masks, you’ll want to not wrap the bottom section of the mask so it will attach flush to the tube in the middle. To figure out how long the tube section needs to be, I took a few photos of it next to me before I glued it together. You should have some reference photos to keep going back to as you create every piece. Make sure you don’t use fan art as it could be a bit different from the original.


Once you have it all sized correctly, it’s time to glue it all together. Note, I left the gaps at the bottom of the end pieces because I thought the fabric would hide it pretty well in the end. The top portion was pretty smooth, but you can see the shapes at the bottom. If I did it again I would cut those off and make sure everything is filled in and smoothed out with a dremel.
After it’s all glued, you’ll need to cut out the leg holes, arm holes, mouth, eyes, and cut a long slit on the back, big enough to get into the suit. If you didn’t cut the slit in the back long enough, you might rip the foam. Don’t worry if that happens. Once you put the fabric over, it will hide anything rough you left on the EVA foam.
One details I made sure to have was to make the legs holes a bit behind the front of the shape. This makes it a bit hard to walk normally. You’ll end up walking bow-legged a bit, but it will be more accurate to the character design. If you look at the reference photos, he has that unique bone structure on that area and his legs are off to the side, unlike human legs.
One more thing to add before the fabric is the pickle dimples. Cut a few dome shaped foam pieces and glue them to the body based on the references.


Make the Fabric Pattern
Once everything is done with the body, you’re ready to start on the fabric pattern. To create a pattern we’ll need to do the same technique we did with the foam, but on this entire foam pickle. Since that is a lot of masking tape, I decided to use craft paper for the mid section in place of the masking tape. You’ll have to divide it into two pieces, front and back. If you have some basic sewing knowledge, you’ll want to minimize the seam on the top of his forehead so it’s as clean as possible. I probably could have done a bit better with mine, but it’s a good enough job that it’s not noticeable to most people. You’ll also want to make sure the fabric can wrap around all the openings. We will super glue the fabric on the inner side of the pickle foam so the mess isn’t
noticeable.


Pin the two pieces of green fabric together and give it a test fit to make sure everything aligns well. If not, make the needed alterations so it does fit nicely. After you do make your minor tweaks, cut a slit in the middle of the back so you have some way to slip it off.
Sew a 2 inch strip of fabric to the left of the slit that will work as your velcro flap. You’ll sew velcro onto the flap and pickle next to the slit
Sew the fabric together. When done, go ahead and slip it over the foam pickle. Since it should be a tight fit, you’ll need to push in the foam a bit to get it through. Line up the limb holes and make any tweaks to areas that aren’t fitting correctly. Less is more so try not to cut more than you needed and end up not having enough fabric to cover the foam. After the fabric was in place, I super glued it to the foam inside of the pickle form by pulling it tight around them then adding glue.

Details on the Pickle
The first details I added were the face parts. I used 3’ inch foam balls for the eyes, EVA foam for the eyebrow, nose, and teeth. Foam balls were wrapped in white fabric, I used an old t-shirt, then glued into place. Nose, eyebrow, and teeth were Dremelled and sanded to the right shape then painted and glued. I saved adding the mouth screen till the end.
The pickle dimples were two different shades of green craft foam glued to each other and them glued to the spots where you placed your dimples earlier. I also made a green shape for where the needle goes into the pickle head. (larger middle piece in photo)


The next details to create are the ribs, backbone, and hip bones. Both were made from EVA foam sanded into a rounded bone shape. Having access to a table sander will make your life 10x easier. I don’t even want to think how long it would take to manually sand all these pieces.
You’ll need the following parts:
6 rib pieces long enough to reach the backbone
2 hip bones
1 backbone
1 large screw for left hip
1 pipe connector between pickle and rat brain
The rib pieces are simple strips of EVA foam, you just need to make sure it’s long enough to reach the backbone. All pieces were sprayed with Plasti-dip first to seal, then spray painted to the desired color. I like to use Rust-Oleum spray paint as it doesn’t tend to crack when the foam is curved.


To create the hip bones you’ll need to create another tape pattern to make sure it fits on the pickle. I just used painter’s tape without the cling wrap since it doesn’t stick so hard and it was a small piece. Before gluing the hip pieces onto the pickle, I super glued the fabric pieces that represent the bloody guts under and wrapped around the hip pieces. See reference shots to know how many you need to create.
The backbone should be thicker, so I glued 2 strips of EVA foam together then sanded it round. Make sure it can reach into the brain all the way down to the bottom of the pickle. I ended up cutting a hole the width of the backbone on the bottom of the brain so I can insert it, so it stays in place. The backbone is velcroed to the middle of the flap. The brain is connected to the EVA foam with two zip ties.
Attaching the ribs to the backbone is very tricky and can be improved from my method. Since the opening to the pickle is to the right of the backbone, I glued the left ribs permanently into the backbone. I made three 1/2 inch holes into the backbone where the ribs are inserted and glued. The right ribs are velcroed in after you get into the costume, but isn’t the greatest method. I think trying magnets might be a better route, but as of this I haven’t tested it. Either way, it needs to be removable so you can get through the opening.

The last thing to do is create the shoulder covers. Create two rounded shapes from EVA foam that cover the top of your shoulders like the reference. Create two short spikes similar to the rib ends that will be glued to the front of the shoulder covers. Wrap one with the grey fur and the other with the pink fabric. On the pink fabric I sewed a strip that represents the muscle piece seen in the reference. I then outlined it with a black sharpie to get that cel-shaded look in the cartoon. Shoulders are attached to the pickle with two zip ties. Make sure you thread them through enough of the EVA foam and not just the fabric or it might rip off easy.
Here is a 360 of Pickle Rick you can rotate to check out his back side. This won't load on most mobile phones, so I included photos as well.


Creating The Body Suit
Now that we are done with the pickle portion of the costume, it’s on to the arms and legs. Hopefully you have some sewing experience, if not this can be a very challenging part of the costume and you may want to find a friend who does know how to sew to do it for you.
I only have been sewing for about a year so what I did it pretty basic in sewing land so don’t be too afraid to try.
To create an easy pattern that fits your body size, find a fitted long-sleeve athletic top and leggings that you don’t mind cutting up. We’ll be cutting the arms and legs sleeves from each that we’ll re-purpose as patterns.
Leggings
Starting with the leggings, cut one leg sleeve off high enough that the seam can’t be seen when you put the pickle on. You’ll want to wear the leggings and put on the pickle to find out where you should cut. Having a friend to mark a cut line would be handy. If you know the basics of pattern making, you’ll just need to cut a slit on the leg piece to lay across your fabric to size your pattern. Use the pink muscle colored fabric for both legs.

For the left leg, we’ll need to create the bone shapes by sewing two thin tubes, and two shorter thicker tubes for around the knee. It’s hard to describe how I sewed them together, hopefully the photos are self explanatory. Once that’s finished, you’ll sew this onto the leggings before you attach it back to the crotch section.
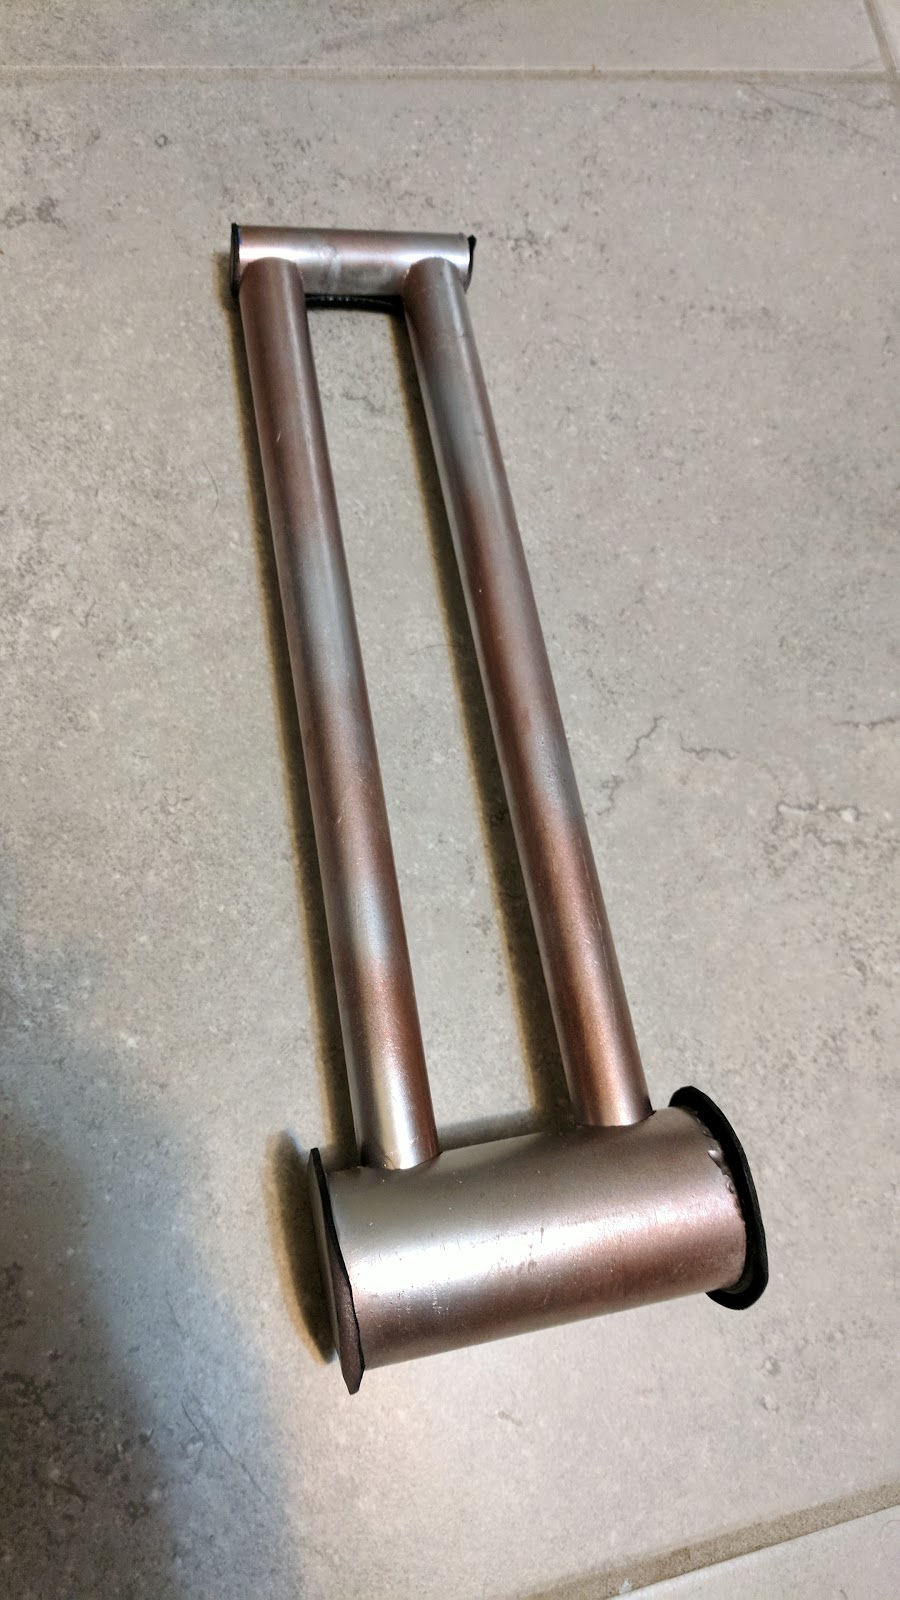
The right thigh has a rigid brace I made out of different sized pvc pipes and joints. Two thigh length sections of ¾ inch attached on either end with one ¾ inch and a wider about 3 inch tube. I had to drill two large holes into the wider pipe and used screws to secure the other end.
With the same pattern, create three basic fur sections. A right shin, left thigh, and left ankle based on the reference photos. Only the left thigh piece is sewn in place with the leggings. The other two are just slipped on and should stay in place if made tight enough.
Arm Sleeves and Gloves
Following the same steps as the legs, cut the arms deep enough that the seam doesn’t show outside the pickle. You’ll need a variety of the stretch fabrics on the list to complete these sleeves and gloves.


Starting with the left sleeve, you’ll need to simply make a full black sleeve or if you bought a black top that doesn’t have any design on it, you can use that. To create the illusion of a full bone arm like Pickle Rick, I decided to draw out an arm bone, and sew two copies of them onto the arm like those fun skeleton shirts. I drew a very basic bone similar to the reference photos that stretches from either ends of the sleeve. I also created a pink tendon that just a simple strip of fabric that attaches to the middle of the upper and lower arm like in the reference.
The left glove is a simple dark pink with pointy fingers, and bloody wrist. I made a simple glove pattern by tracing my hand on some throw away fabric. I made each finger pointy instead of my actual rounded finger. For the bloody wrist, I cut a small piece of dark red fabric and glued it to the wrist section.
The right sleeve is split into two sections, the upper pink muscle, and the lower bone section. I cut the pattern in half then created these two sections with the proper fabric. The muscle section has an added muscle details in a different shade of pink that you need to sew on.
The right glove is a longer than the left and in grey, with a bloody wrist section. I made the same type of pattern as the left but extended the wrist a couple inches and glued the dark red fabric to the end. The wrist should look like a rat lost its fur, so I drew a bunch of black dots where the fur is missing. With the fur, make a bracelet based on the reference that you can slip on. No need to sew that on to the glove to complicate things.

Making Rat Feet
Full disclosure. I made the feet based on a YouTube video I watched the same day I made the feet so I’m sure improvements can be made. First I glued two pieces of EVA foam on top of each other so it was thick enough to match the reference. I cut the shape of the front of the shoe out so it can become an extension to the shoe then I dremeled and sanded it till it looked like the rat feet in the ref. The foam is then glued with barge to the shoe.


Next I carefully use the double-sided carpet tape to cover the entire top section of the shoe and EVA foam. Once covered, carefully take your grey fabric and cover the shoe. Start from the front and work your way to the back end of the shoe. Don’t stretch the fabric too much as the tape isn’t that strong and will come undone, which happened to mine. You’ll probably need a second piece to get the section behind the heel covered. I also used super glue to keep the fabric from coming off the edges near the sole of the shoe.
Gauntlets
If you know you’re way around EVA foam, you’ll be able to whip the gauntlets up pretty easily. You start with a box shape and add the wheels, blade, and wrist wraps. There’s a couple simple details that you can copy from the reference photos.


Conclusion
And that’s about it. I hope you found that helpful. I’m creating a detailed video tutorial series on my YouTube Channel. Link at the top of the guide. Make sure to follow all my channels for more Pickle Rick mayhem and good luck with building yours! 🥒🥒🥒
-Mar
Video Tutorials
In addition to the guide, I'm creating a series of YouTube videos on how to create the costume.
Comments